|
|
|
|
Standard Tuning
Standard tuning is the standard for a good reason. Open G is great and the chords are easy on your hands but standard tuning is much more flexible when it comes to playing in other keys, working with bass lines and just about everything else. It's the standard guitar tuning for a reason. It works for anything and everything. The downside to standard tuning is that some of the chord forms can be a little bit hard on your fretting hand. That's the main reason we worked in open G tuning for most of this book. Learning the proper form for making chords in standard tuning will be a lot easier now that you have strengthened up your hands a bit. In open standard tuning:
If you don't have a tuner you can tune the guitar to itself by following these steps:
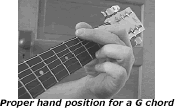
If you strum across the strings you will discover the other kind of funky thing about standard tuning: it sounds awful when you strum the open strings. We are not tuning to a chord anymore so in order to play anything we are always going to be fretting at least one string. Lets take a shot at playing our first chord in standard tuning! The G chord can be a little tricky at first because you have to stretch across all six strings, but if you position your hand properly it's really not that bad.
As you can see in the photograph, my thumb is not on the centerline of the neck. It is resting on the edge of the fretboard. This lets me swing out my wrist a little bit and that puts my fingers in a position that minimizes the reach for the fifth and sixth strings.
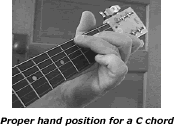
If you look at the image of my hand position when I play a C chord you will notice that the angle of my wrist and forearm has changed.
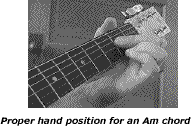
Not only that, my thumb has also moved so that the guitar neck is now cupped in the space between my thumb and my index finger. The whole trick to making cords easily in standard tuning is working out how to position your hand so that your fingers can just drop down onto the proper strings. Even when we make a chord that is closely related to the C chord like Am the entire hand and wrist position changes, but this time the movement is a little bit subtler.
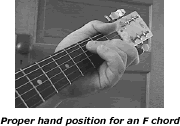
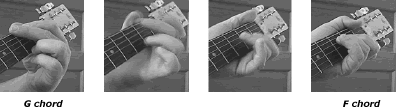
If there is any rule to forming chords on the guitar in standard tuning it is that you can never "lock" your hand into a single position. Every chord you make may require altering the position of your wrist, hand and forearm. There is one chord position that has driven aspiring guitar players throughout history to tears: The F chord.
The problem with the F chord is that you have to fret all six strings . . .but you only have four fingers and a thumb to work with. This isn't a hard chord to play if you think out the hand position. Look at the way my hand is positioned for the C and G chords. You will see that the F chord requires a different wrist angle and the thumb is wrapped around in order to fret the sixth string.
To illustrate how the angle and position of your entire hand changes when you move from chord to chord I captured the change from a G to an F chord on film and broke it down into still images.
Wrapping your thumb around to fret the sixth string when you make an F chord is not going to be easy the first few times you try it. If you really have trouble you can ignore the sixth string for a little while, but don't bypass this altogether because in a lot of ways getting this down will really help you play with proper hand position. I can't stress enough how important it is to be conscious of your hand position when you start working on chords. If something hurts stop and move things into a more comfortable position. Don't buy into a "feel the burn" philosophy with this because pain is your body's way to telling you that something is wrong. I made a real mistake when I was starting out. I followed the directions in various books and tried to make chords with my hand pretty much locked into a set position. It made progressing really tough and I wound up having some serious trouble with my left hand. Things got to the point where my hand would actually go numb after a few songs. Believe me, this is not a good thing. In order to solve the problem I wound up going back to square one and spent three months in a lakeside cabin in Maine forcing myself to forget everything I thought I new about making chords and training myself to play in a way that didn't tear up my hands. I liked living in Maine. It's a pretty state and folks there are really nice, but relearning the guitar and forgetting a whole lot of bad habits wasn't exactly a lot of fun. To sum it up, you might as well learn it right when you start out because no matter how long you put it off you are going to have to learn it somewhere down the road. |
|||||||||||||||
| © Stover Mountain Music All Rights Reserved | |