|
|
|
|
Getting StartedIn this chapter you will learn:
|
|||||||||||||||
| google_color_link = "000080"; |
There are two types of electronic tuners: guitar tuners and chromatic tuners. Guitar tuners only work for the six notes of the guitar. Chromatic tuners can be used to tune any instrument.
There are quite a few makes and models on the market with a pretty wide price range. I would not recommend buying the most expensive tuner because if you start playing out you will most likely lose or drop it. I've left more than one nice tuner sitting on a park bench or in a church hall never thinking about it until I was more than halfway home. If you don't have an electronic tuner don't sweat it. I'll go over how to tune the guitar to itself later on in this chapter.
For most of this book we are going to be working out of open G tuning. We will move on to standard tuning (E A D G B E) near the end of this book and continue with it through Volume Two.
An open tuning simply means that the guitar strings are tuned to the notes of a major or minor chord. This means that when you strum the strings without fretting a single note you get a chord.
Right about now you are asking yourself, "Why are we starting out with an open tuning?"
Well, since you asked, I decided to start with open G simply because it lets you start playing chords without a lot of left hand acrobatics. It also gives you a chance to work on right hand picking techniques without worrying about complicated chord changes.
See, when you start out on the guitar you are faced with several challenges and the most difficult of these is learning how to train your left and right hands to perform independent actions. Standard tuning is an amazingly versatile guitar tuning (that's one of the reasons it's the standard) but the chord forms can be pretty difficult for a beginner to master. By starting out in open G we can use simple chord forms that will give you a chance to build up the strength of your fretting hand.
This isn't new. Open G tuning has been around for a long time. Early blues and country guitar players used it extensively, sometimes giving it the name "Spanish Tuning" possibly because of the old dance tune Spanish Fandango, but nobody knows for sure. Open G is also one of the Hawaiian "slack key" tunings. Once you start working in open G you will understand how the term slack key came to be associated with this tuning. The strings are not exactly slack, but they are at a much lower tension than standard tuning.
As I mentioned before, this will be a lot easier to do if you have an electronic tuner. I will go over the steps to tune the guitar to itself but you should know ahead of time that it takes a while to develop the skills to do this quickly.
One other thing you need to keep in mind when you are tuning is that you should only turn the tuning machines on a string that is vibrating. Strike the string you want to tune and turn the tuning peg while it is sounding. This will save you a lot of broken strings.
In open G tuning:
If you don't have a tuner you can tune the guitar to itself by following these steps:
Take this slow and easy. Tuning a guitar is a skill that must be developed over time. When you are finished strum down (from the sixth string to the first) across the strings. If you are in tune you've just played an open G chord.
It sounds kind of cool, doesn't it? Now that we are in tune let's get started on picking hand technique.
The first picking pattern we are going to work with is the thumb-brush. It's really easy because all you have to do is; you guessed it, brush the strings with your thumb.
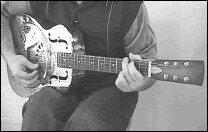
Place your right hand- or, to keep lefties from feeling left out (pun not intended) your "picking hand"- so that your thumb is resting on the sixth string and your little finger is resting on the top of the guitar below the first string. I usually plant my ring and little fingers when I am strumming. Some folks just plant the little finger. Either way works as you're only anchoring to give your hand little bit more stability.
Don't press down too hard with your hand or your fingers and don't get all tensed up. Get comfortable and set things up so that if you draw your thumb over towards your little finger you wind up strumming across all six strings.
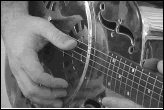 Make sure the strings all ring out. If your anchor fingers
are muting the first string readjust your position.
Make sure the strings all ring out. If your anchor fingers
are muting the first string readjust your position.
When you draw your thumb across the strings avoid excessive arm or wrist movement. The action here is more from your thumb than anywhere else.
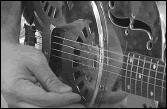 Try this lightly a few times and then give it a good hard
strum once or twice. Do not strum up with your thumb.
After you strum down just sort of roll your thumb back up to around
the sixth string. Now strum down across the strings four times fairly
slowly.
Try this lightly a few times and then give it a good hard
strum once or twice. Do not strum up with your thumb.
After you strum down just sort of roll your thumb back up to around
the sixth string. Now strum down across the strings four times fairly
slowly.
When I say "slowly" I don't mean to drag your thumb across the strings so that each string rings out individually. Make the brush fairly crisp. Now we have to start thinking of the strum in terms of rhythm. What we are going to do is play the strum in sets of four. We will be counting out loud each time our thumb makes a downstroke. Make an honest effort to keep your speed the same all the way through.
Ready? Lets go!
Strum down while tapping your foot. Say "one".
Roll your thumb back to the sixth string.
Strum down while tapping your foot. Say "two".
Roll your thumb back to the sixth string.
Strum down while tapping your foot. Say "three".
Roll your thumb back to the sixth string.
Strum down while tapping your foot. Say "four".
Roll your thumb back to the sixth string.
Strum down while tapping your foot. Say "one".
Roll your thumb back to the sixth string.
Strum down while tapping your foot. Say "two".
And so on . . .
Now if you noticed, we didn't put any kind of a separation between the "four" stroke and the "one" stroke. We are playing the strum in sets of four, but you are not taking any kind of a break between sets. The count just keeps repeating.
What you are playing right now is a four quarter note strum.
What's that, you say? What's a quarter note? I'm glad you asked because it makes a nice lead into the next part of this chapter on note values and rhythm!
Do not panic when you see some sheet music in this section. We are not going cover reading music here (we won't go into reading music until the tail end of Volume Two). We are going to look at how note values are written in order to help you get a grip on the timing of the thumb-brush strum.
In other words, we are not worrying about notes in a melodic sense right now. We are simply looking at the time value of the note symbols in terms of rhythm.
Every note in a piece of music has a time value assigned to it. That can be a difficult concept to grasp at first because when you are just starting out on a musical instrument it's easy to assume that players just sort of pick up a guitar and start playing. As a matter of fact, I'm sure that when you first got your guitar you just picked it up and started banging on it. That's what almost everybody does because we remember the melody line of a song and kind of ignore the rhythm that holds that melody together.
I know that the idea of giving a value to each note sounds kind of complex at first, but in a lot of ways you have been working with similar concepts your whole life. For example, when we talk there is a rhythm to our speech. We separate words with pauses and sometimes we shorten or lengthen those pauses to create a dramatic effect. If we didn't use those pauses to measure out our speech everything we said would runtogetherlikethis.
That's why rhythm is so important in music. Rhythm is not only the engine that drives music, it is also kind of like a canvas that we use to create pictures in sound. Without rhythm the notes would have no context and everything would just come out like noise. When you were tapping your foot and strumming the "one, two, three, four" count you were playing a rhythm in 4/4 time. What 4/4 time "means" is that we are playing the equivalent of four quarter notes for every measure of music. In order to understand that we have to look at some basic definitions of how music is written down. The note value symbols are written in what is called standard music notation.
Music notation is written on a staff.
![]()
A staff is just five lines. Notes are written on the lines or in the spaces. The funky little squiggle at the beginning of the staff is a G clef. We will address what a G clef represents later on.
When you are writing music in standard notation each group of notes is broken up into a measure.
The time signature signifies the basic count for each measure. In this case the 4/4 on the staff represents 4/4 time. As I said before, that means four beats to a measure with the quarter note getting the beat.
![]()
A line running down through the staff marks measures or bars. I call them measures and some folks refer to them as bars like in the term "twelve bar blues." Either way is right. The example above shows three measures. In 4/4 time each measure is going to have four beats.
A beat is the term we use to describe the pulse of the music.
Don't think of the measure as a stop sign. Measures are really only a way to break music into more manageable chunks.
The count for a measure is continuous. Even when the music stops, like when we play a rest, the count continues. The easiest way to remember that is to remind yourself that Sonny & Cher were right. The Beat Goes On.
The really amazing thing about measures is that the beats can be broken up in all sorts of ways by using whole notes, half notes, quarter notes, eighth notes and sixteenth notes. Any combinations of notes can be used as long as the combined value of the notes fits the time signature.
Let's take a look at the usual suspects when it comes to note values.
![]() A whole note is just that, a note that is counted for the
whole value of the measure.
A whole note is just that, a note that is counted for the
whole value of the measure.
To get the feeling of how a whole note works play one thumb-brush strum and count, "one two three four" for each measure:

In other words, if we were playing our thumb-brush strum as a whole note pattern in 4/4 time each strum would be held for four beats.
![]() A half note has one half the time value of a whole note.
A half note has one half the time value of a whole note.
To get the feeling of how a half note works play a thumb-brush strum and count "one two." Then strum again and count "three four" in each measure:

So if we gave the thumb-brush strum a half note value each strum would be held for two beats.
![]() A quarter note has one half the time value of a half note.
A quarter note has one half the time value of a half note.
This is the note value we are giving the thumb-brush strum. Each strum is held for one beat.

![]() An eighth note has one half the time value of a quarter note.
An eighth note has one half the time value of a quarter note.

This can be hard to visualize at first because up to this point we have just been counting from one to four. When you are playing the thumb-brush strum you are tapping your foot for each count. You tap your foot on one, bring it back up and tap your foot on two. When you are playing eighth notes tap your foot to count "one" and as your foot comes back up say "and." Then count "two" as you bring it down again. This gives you the "1 & 2 & 3 & 4 &" count found in an eighth note strumming pattern.
It is crucial to keep an even count when you are playing. Every note is a quarter note so every note has to be held exactly as long as the note before it or the whole system gets out of whack.
Ok, work on the quarter note thumb brush for a little while and make an effort towards keeping the count steady. Be sure to count out loud and tap your foot. It will help you stay in rhythm.
Don't rush this. A lot of people I share this technique with will wave their thumb at the guitar a few times and say, "I've got this." It's always interesting to watch these folks when we move on to the next step and they realize that they don't have it. Give yourself a day or two just running through this with a focus on keeping a steady rhythm. Work on playing the strum steady for five to ten minutes at a time.
We have covered a lot of material in this chapter, but if you keep things slow and easy you will be making music in no time.
When you are ready head over to the next chapter where we will begin working with chords and start playing songs!
| © Stover Mountain Music All Rights Reserved | |